Every discovery in human history has started out as some kind of experiment, but for some reason, the older we get, the less likely we are to experiment. But, as the cliché goes, if we do what we’ve always done, we’ll get what we’ve always got.
Embracing experiments is a smart way to get great results.
Why we shy away from experimenting
Most organisational cultures prize knowing and certainty over learning and uncertainty. We stick with what has worked for us in the past, but often fail to notice how the world is changing.
One day we wake up to the fact that we’re not getting the results we used to. But trying something new feels risky. At least we know what we’ll get when we follow our usual pattern. And we imagine all sorts of terrible consequences might arise if we run an experiment and it fails.
Why a "failed" experiment is worth its weight in gold
Let’s be frank: not every experiment will be successful. In fact, we’re likely to have more “misses” than “hits”, especially when we’re getting started.
So we need to normalise going back to the drawing board! Just because an experiment didn’t deliver the results we wanted doesn’t mean it was wasted. Each time we run an experiment, we get data on what does and/or doesn’t work. Every experiment is a chance to learn, to iterate, and to get closer to our ideal results.
How a failed experiment gave us the Post-it® Note
Dr Spencer Silver was a researcher for 3M. He was trying to create a strong adhesive, and one of his experiments produced a weak adhesive. Definitely not what he was aiming for! But he noticed a curious property – it could be removed and reapplied multiple times without losing its stickiness. He told colleagues about his discovery, but no one found a use for it.
Years later, another 3M scientist, Art Fry, lost his place in his hymnal when the scrap of paper he was using fell out. He remembered Dr Silver’s “failed” adhesive experiment; his “Aha!” moment eventually resulted in the Post-it® Note.
There are now over 1,000 Post-it® products on the market. Not bad for a “failed” experiment! Later on in this article, I’ll talk about how to move on from failed experiments that don’t deliver a Post-it® outcome.

How to run an experiment
I’m going to assume that you’ve already prioritised some great ideas, and aligned them with your vision. If not, I highly recommend reading the linked articles. And if you’re yet to come up with your great ideas, I’ve written a ten-part series that will help you do just that.
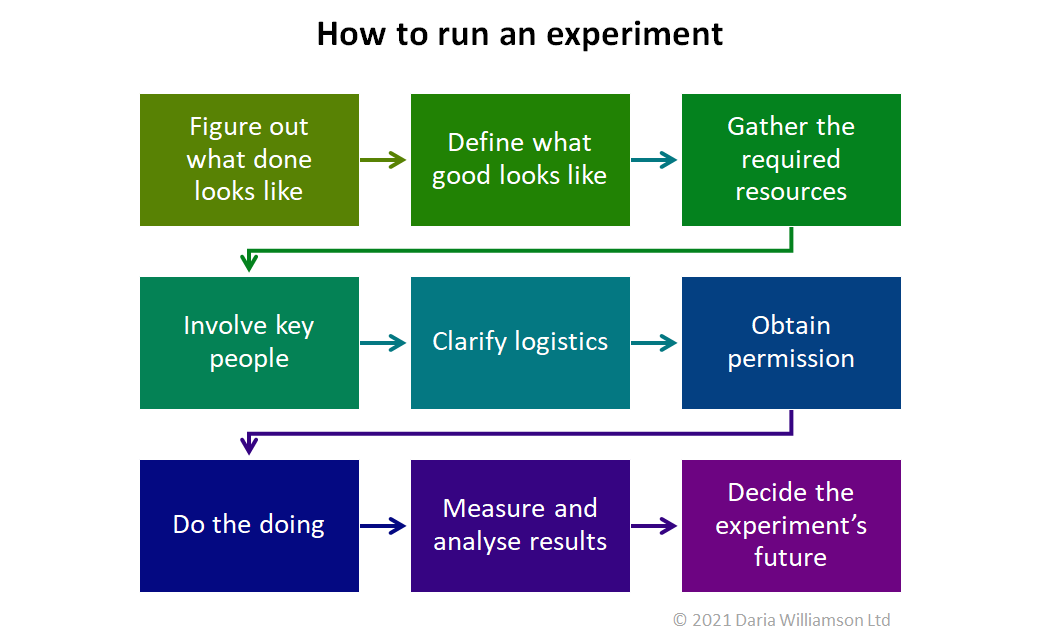
So now you’re ready to run an experiment. Great! Here’s your 9-step process:
- Figure out what “done” looks like
- Define what “good” looks like
- Gather the required resources
- Involve key people
- Clarify logistics
- Obtain permission
- Do the doing
- Measure and analyse results
- Decide the experiment’s future
The experiment process explained
1. Figure out what "done" looks like
Clearly define the experiment. Is it writing up a new procedure, creating a new checklist, changing the font on a website…? Write down exactly what you will be changing, and how you will be changing it.
It’s tempting to experiment with several changes at once. But I strongly caution against that.
Why? Because if your results improve, how will you know which change(s) worked? At the end of each experiment cycle, you need to know what to keep, and what to drop.
2. Define what "good" looks like
What results are you expecting? You need to define this in order to determine if the experiment was succesful.
You’re not going to achieve perfection in a single experiment, so set a realistic expectation.
Is a 5% improvement attainable? What would you see/hear/feel if you achieved that? How will you define success? More customers through the door? Higher quality or yield? Increased sales conversion? Reduced cost to serve? Faster time to completion?
Pick two to three key performance indicators that you expect to change for the better. And work out how to measure them in as short an interval as possible (i.e. don’t wait until the end of the financial quarter to report on daily sales).
3. Gather the required resources
It’s important to do this early, because it’s no good getting permission (step 6) only to discover you can’t access the resources you need.
Consider things such as:
- time (yours and others’)
- money
- support
- materials
- training
- documentation
- special equipment
- measuring tools/systems
Then make sure that you can access those resources when you will need them.

4. Involve key people
Run a stakeholder analysis. Identify who the change will involve and affect, and who will support or block your experiment. For the blockers, consider their possible concerns, and how you can lower the barriers to get their support.
Some will be reassured by the idea of an experiment, while others may find the concept unnerving. You’ll need to “read the room” with each stakeholder to shape your message to secure their support.
Consider building alliances – identify your supporters, get them on-board individually, then bring them together as a group. They can help you round up support from those who are neutral or opposed.
5. Clarify logistics
This is the where, when, how, who and what of the experiment. By following the preceeding steps, you will have developed the foundation for an implementation plan. Now is the time to get really specific, such as:
- What is the experiment “field”? Which store/unit/department/office/team/production line will participate?
- When will you start the experiment? When will it end? Define dates and times.
- How will you implement the experiment?
- What resources, tools, systems and processes do you need?
- How will you communicate and deliver training?
- Who will implement the experiment? Oversee it? Measure it?
Double-check your assumptions. Make sure that the people who committed at step 4 are still available. Develop contingency plans.
6. Obtain permission
Ensure that you secure appropriate sign-off before you start the experiment. Steps 1-5 have all but written your business case for you.
But bear in mind that sometimes it’s easier to ask forgiveness than permission. Note: this doesn’t apply to any safety, statutory, regulatory or compliance matters – in those cases, ALWAYS obtain appropriate permissions first!
7. Do the doing
Get stuck in! There is never a perfect time to make a change (nor a perfect change), so you may as well seize the day and do it now.
The sooner you start, the sooner you’ll get performance data to measure the experiment’s results.
8. Measure and analyse results
Whatever you do, don’t skip over or skimp on this step. This is the one that tells you whether your experiment made things better! In fact, it’s so important that the next article in the series covers how to set goals and track progress.
At step 2, you defined what good looks like. So now you’re gathering data on the measures you picked.
Measure over as short an interval as is practical. For example, if you want to increase production throughput, measure on an hourly or per-shift basis, not a weekly or monthly basis. The shorter the turnaround in reporting, the more quickly you’ll see if you’ve made a positive difference.
And collect enough data to confirm if the experiment is working – don’t just collect data for an hour and assume on that basis that multi-day process is working perfectly.
Also, include stakeholder feedback in your measurement. Even if you get great results from the experiment, you need ongoing stakeholder support to make the results sustainable.
9. Decide the experiment's future
Once you’ve collected enough data, analyse the results.
What aligned with your expectations? What surprised you? Why? Did you get positive results? Are your positive results strong enough to make the experiment “how we do things around here”? If so, make that happen. And if the results are positive, but not yet strong enough to make the change permanent, how can you re-design the experiment to strengthen the results?
If the results were negative, halt the experiment (and see the following section for how to move on).
When halting an experiment, return to “normal state” (i.e. how things worked pre-experiment) and get the process stabilised before running a new experiment.
Whatever you decide, communicate clearly with all your stakeholders. The better informed they are, the greater the likelihood of retaining their support.
Moving on from a failed experiment
Not every “failed” experiment will generate a Post-it®-type outcome. Those tend to be the exceptional cases.
But all is not lost! We can use our failed experiments to refine our approach to the improvement we’re trying to make.
How? By holding an “experiment post-mortem”, where you dissect the experiment in order to learn from it. In fact, post-mortems of successful experiments are also useful so you can understand why they succeeded.
Hold an "experiment post-mortem"
Answer the following questions to break down the experiment:
- What went well?
- Why did it go well?
- What didn’t go well?
- Why didn’t it go well?
- What should we do more of? Less of?
- What should we stop doing? Start doing?
- How else might we apply the learnings from this experiment?
- Who could help us improve this experiment, or future experiments?
The only real mistake is the one from which we learn nothing
Henry Ford Tweet
Once you’ve answered these questions, you’ll have a clear idea of what to change for your next experiment (or how to make future experiments more likely to succeed), and who to involve. As I said earlier, only change one thing at a time. That way you can identify what worked well (so you can keep it) and what hasn’t (so you can stop it).
Introducing the Plan, Do, Check, Act (PDCA) Cycle
The process I’ve described above follows the Plan, Do, Check, Act cycle, established by W Edwards Deming (“the father of quality”). It’s a simple but powerful approach to continous improvement.
It assumes that we won’t achieve perfection with our first improvement. Instead, we aim for small, cumulative improvements.
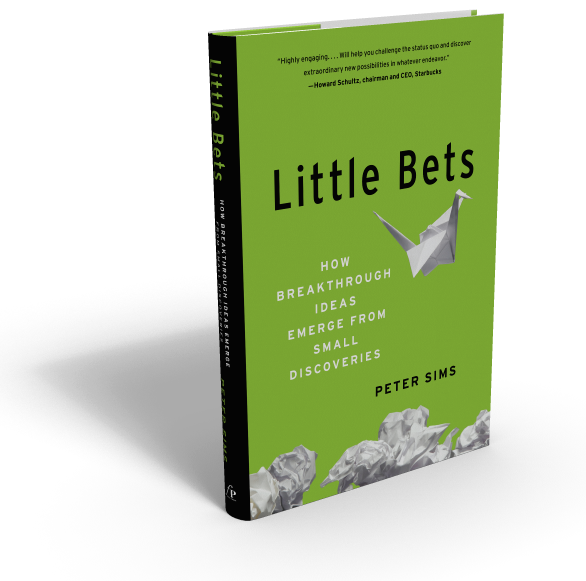
Each experiment is a small bet. We “bet” that this change will make things better, then we measure the result. If our results improve, we try the next small bet. If not, we stop the experiment and try a different one.
This is the premise of a fantastic book called ‘Little Bets’ by Peter Sims. I highly recommend reading and then applying its principles to your life and work.
Progress check
This article is part of the series, ‘How to turn great ideas into great results’. Firstly, I dug into why we struggle to get started. And now I’m sharing seven strategies to help. The strategy articles so far are:
- Prioritise
- Align your actions with your vision
- Experiment (this article)

Stay tuned for the next article covering the next strategy for turning your great ideas into great results. You can keep an eye on the series page for new articles, or sign up to my weekly newsletter below to be the first in the know when a new article is published.
If you’d like to learn more about generating ideas, check out the companion to this series, ‘How to have great ideas‘. It has ten science-backed strategies to help you generate great ideas.
Resources
- History Timeline: Post-it® Notes – Post-it.com
- Deming The Man – The W. Edwards Deming Institute
- What is the Plan-Do-Check-Act (PDCA) cycle? – American Society for Quality
- Little Bets – Peter Sims


2 thoughts on “Great results: Strategy 3 – experiment”
Pingback: How to turn great ideas into great results: Strategy 4 – set goals and track progress ~ Daria Williamson
Pingback: How to turn great ideas into great results: Strategy 5 – involve others ~2021 ~ Daria Williamson
Comments are closed.